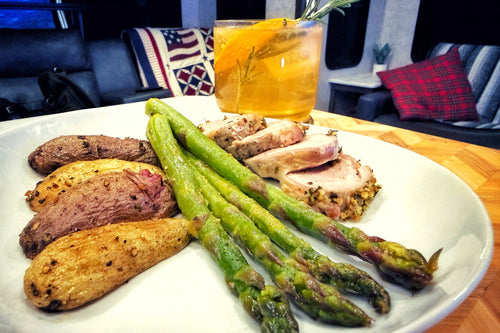
Slow Cooked Standing Prime Rib Roast
Reverse-Seared Standing Rib Roast (Prime Rib)
Rated 5.0 stars by 1 users
Category
Dinner
Cuisine
American
Author:
Robert Moreland
Servings
9
Prep Time
20 minutes
Cook Time
4 hours 5 minutes
This recipe employs the "reverse sear" method to transform a massive 10 lb standing rib roast into a tender, evenly cooked centerpiece. Unlike traditional roasting, which often blasts the meat with heat first, this technique prioritizes consistency and texture.
The Cut: A bone-in Standing Rib Roast (Prime Rib), typically comprising ribs 6 through 12.
The Flavor Profile: A minimalist approach allowing the beef to shine, seasoned generously with coarse Kosher salt, cracked black pepper, garlic powder, and fresh rosemary and thyme.
The Method:
Dry Brine: The roast is salted and refrigerated uncovered for 24 hours.
Low & Slow: Cooked at a gentle 250°F (120°C) until the internal temperature nears the target (e.g., 115°F for rare).
Rest: The meat rests for 30-45 minutes to redistribute juices.
High-Heat Sear: The roast is blasted at 500°F (260°C) for just 6-10 minutes to create a crust immediately before serving.
A Slice of History: From Royal Courts to Sunday Roasts
The "Standing Rib Roast" is a dish steeped in Anglo tradition, serving as a culinary symbol of prosperity for centuries.
The "Sunday Roast" Tradition: The roots of this dish lie in the British Industrial Revolution. In an era when most families did not own large ovens, they would drop their cut of beef off at the local baker's on their way to church. The baker would cook the meat in the residual heat of their bread ovens (which weren't used for bread on Sundays). By the time the service ended, the roast was ready—giving birth to the "Sunday Roast."
Royal "Beefeaters": The British love affair with roast beef goes back even further to the 15th century. The Yeomen of the Guard (royal bodyguards) were famously nicknamed "Beefeaters" due to their preferential allowance of large rations of roast beef from the King's table.
"Prime" vs. "Standing": The term "Standing" refers to the cooking method—roasting the meat upright on its own bones, which acts as a natural rack. Interestingly, "Prime Rib" refers to the primal cut of the cow (the rib section), not necessarily the USDA quality grade. You can have a "Choice" grade Prime Rib, though the confusion is common!
The Science Behind the Recipe
This recipe relies on physics and chemistry rather than luck to ensure the meat is perfect.
1. Dry Brining & Osmosis
Salting the meat 24 hours in advance does more than season it. Through osmosis, the salt draws moisture out of the beef. This moisture dissolves the salt, creating a concentrated brine that is then reabsorbed into the meat. This breaks down (denatures) muscle proteins, allowing them to hold onto more water during cooking. The result is a roast that is seasoned deep within and stays significantly juicier.
2. The Reverse Sear (Thermodynamics)
Traditional high-heat roasting creates a "grey band"—a thick layer of overcooked meat surrounding the perfect pink center. By cooking at a low 250°F first, you minimize the temperature gradient, ensuring the meat is pink from edge to edge.
Enzymatic Activity: The slow warming also keeps the meat's natural enzymes (calpains and cathepsins) active for longer, which helps tenderize the meat before the heat deactivates them.
3. The Maillard Reaction
The final step—blasting the meat at 500°F—triggers the Maillard reaction. This is a chemical reaction between amino acids and reducing sugars that occurs rapidly above 300°F. Because the initial "Dry Brine" dried out the surface of the meat in the fridge, the oven's heat can immediately go to work browning the crust rather than wasting energy evaporating surface water.
4. Resting & Carryover Cooking
Resting is non-negotiable. During cooking, muscle fibers contract and squeeze juices toward the center of the roast. If you cut it immediately, those juices spill out onto the board. Resting allows the fibers to relax and reabsorb the liquid. Additionally, carryover cooking will cause the internal temperature to rise by 5-10 degrees after leaving the oven, which is why the recipe instructs pulling the meat before it hits the final target temperature.

Ingredients
-
1 Standing Rib Roast (Prime Rib), approx. 10 lbs, bone-in
-
Coarse Kosher Salt (generous amount)
-
Black Pepper, freshly cracked
-
Garlic Powder
-
Fresh Herbs (Rosemary and Thyme), chopped and Diced Garlic
-
Butcher’s Twine (if using the "Cut & Tie" method)
Directions
Phase 1: Preparation (The Day Before)
Optional "Cut & Tie" Prep: If you want the flavor benefits of cooking on the bone but the ease of carving a boneless roast, perform this step now (or ask your butcher to do it).
Run a sharp knife along the curve of the bones to detach the meat block from the rib bones in one piece.
Place the meat back onto the bones (reassembling the roast).
Tie the bones and meat securely together with butcher's twine between each bone.
Dry Brine (24 hours prior): Unwrap the roast and pat it completely dry with paper towels. Generously season the entire surface with coarse Kosher salt.
Refrigerate: Place the roast on a wire rack set inside a baking sheet. Refrigerate uncovered overnight.
Why? This dries out the surface for a better crust and seasons the meat deep down.
Note: If you are short on time, salt at least 45 minutes before cooking.
Phase 2: Tempering (Day of Cooking)
Bring to Temp: Remove the roast from the fridge 2 to 3 hours before cooking. Allowing it to come to room temperature is critical for even cooking.
Season: Season the roast with black pepper, garlic powder, and fresh rosemary/thyme.
Important: Do not add more salt if you dry-brined it yesterday.
Phase 3: The Low & Slow Cook
Preheat: Heat your oven to 250°F (120°C).
Roast: Place the meat bone-side down on a rack in a roasting pan. Insert your meat thermometer into the absolutely thickest part of the meat, ensuring it does not touch the bone.
Note: If you completely removed the bones and are cooking the roast boneless, check the temperature earlier; it will cook slightly faster.
Cook: Roast until the internal temperature reaches your "Pull Temp" (see Recipe Extras section below).
Estimation: For a ~10 lb roast, this will take approximately 2.5 to 3.5 hours (roughly 15–20 mins per pound).
Phase 4: The Rest & Sear
The Long Rest: Remove the roast from the oven. Transfer to a cutting board/platter and tent loosely with foil. Let it rest for 30 to 45 minutes.
Do not skip this step. It prevents juices from running out when sliced.
Heat the Oven: While the meat rests, increase your oven temperature to 500°F (260°C) or as high as it will go.
The Sear: Remove the foil. Place the roast back into the blazing hot oven for 6 to 10 minutes. Watch closely—you want the fat to sizzle and brown, but herbs can burn quickly.
Phase 5: Carving
Remove Bones:
If you used the "Cut & Tie" method: Simply snip the butcher's twine with scissors. Lift the large chunk of bones/meat off the bones (it should separate easily). Set the bones aside.
If the bones are still attached: Stand the roast up on the cutting board. Use a carving knife to slice downward, following the curve of the bones, to separate the meat from the ribs.
Phase 6: Slice and Serve
Slice: Place the boneless meat flat on the board and slice against the grain to your desired thickness.
Serve with horse radish cream sauce.
Recipe Note
Temperature Guide
You must pull the roast before it hits the final target temperature, as it will rise while resting.
Desired Doneness
Rare (Cool Red Center): Pull from Oven at 115°F | Final Temp (After Resting) ~125°F
Medium-Rare (Warm Red - Recommended):Pull from Oven at 120°F – 125°F| Final Temp (After Resting) ~130°F - 135°F
Medium (Warm Pink Center): Pull from Oven at 130°F|Final Temp (After Resting) ~140°F
Chef's Tip: Don't throw away the bones! After carving the meat, the ribs are a chef's treat or can be roasted further for a snack the next day.